CMake
In this topic:
•Conversion from winIDEA Build Manager
Introduction
CMake is an open-source, cross-platform tool designed to manage the build process of software using a compiler-independent method. It generates build files for various build systems, including Unix Makefiles, Microsoft Visual Studio project files, and more.
|
For more details on this tool, refer to the CMake documentation. |
Requirements
•CMakePresets.json in the winIDEA workspace folder - Contains Configure Presets and Build Presets, which determine the build folders, generator, and toolchains used in your CMake project.
•CMakeLists.txt - Describes the structure of your project.
Enabling CMake
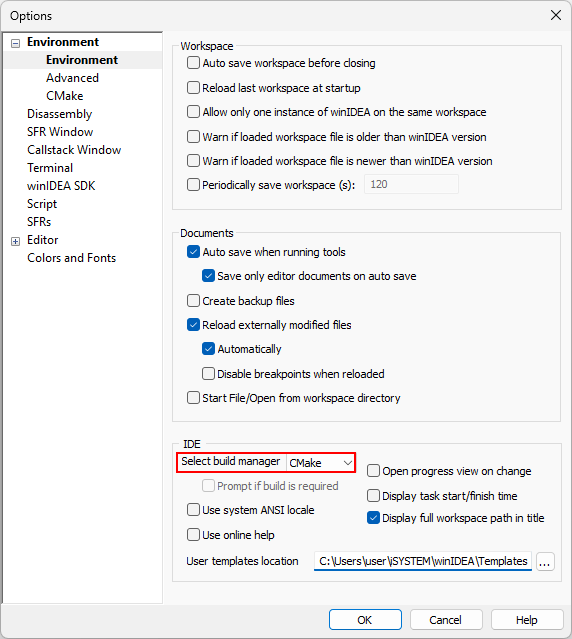
CMake can be enabled in Tools | Options | Environment | IDE | Select build manager.
Toolbar
To enable to toolbar select View | Toolbars | CMake.
Action |
Description |
|---|---|
|
Reload CMake Presets |
|
Configure/Generate |
|
Build (F7) |
|
Install (an Install rule must be defined in the CMake files) |
|
Stop Build |
|
Change Configure Preset |
|
Change Build Preset |


Presets
winIDEA uses the CMakePresets.json file to configure the build process. This file contains options from the Configure and Build Presets. The format of presets files is described in the Presets chapter in the CMake documentation.
winIDEA currently supports version 6 of the file format, but some newer features might still work, like expanding macros in include paths.
winIDEA automatically reloads the CMakePresets.json file whenever you change it, either through winIDEA itself or another program. You can also manually trigger a reload using the Reload button  .
.
|
winIDEA will automatically reconfigure your CMake project if the Configure Preset is changed. If a new Build Preset is selected that is not compatible with the currently selected Configure Preset, then the appropriate Configure Preset will be chosen, and the project will be reconfigured. |
Configure Presets
This section details the essential configuration options, particularly those destined for cross-compilation projects, defined within the Configure Preset.
Generator
CMake generates files for other build systems using its built-in generators. Among the various available generators, Ninja is particularly suited for cross-compiling embedded projects and is officially supported by winIDEA. Additionally, a variant called Ninja Multi-Config is available, though it presents certain challenges that will be discussed later.
CMake executable
This option represents the CMake executable which will be used by winIDEA. If CMake is available in the your PATH, then winIDEA will use that CMake only if this option is not defined.
Toolchain file
The toolchain file is a CMake language file that lets you specify a custom toolchain for building your project. By default, CMake seeks a compiler targeting your native host. For embedded projects, you need to provide a custom toolchain file to direct CMake to your compiler and other necessary utilities. Additionally, you should set the compiler flags for building your project within the toolchain file. For more information, refer to the CMake toolchains chapter in the CMake documentation.
For certain compilers, CMake might fail to identify and test the compiler correctly. You can override or modify these checks by adjusting CMake variables in your toolchain file, such as:
CMAKE_TRY_COMPILE_TARGET_TYPE |
A non-exhaustive list of compilers recognized by CMake can be found in its documentation.
|
A CMake project can only use one toolchain at a time. For embedded targets with multiple cores featuring different architectures and toolchains, you must either create separate Configure Presets or distinct CMake projects for each architecture. |
Build Presets
Each Build Preset must be associated with a Configure Preset. Without a valid, non-hidden Build Preset, you will not be able to build your project from winIDEA.
A CMake build process consists of the following steps:
1.Configure/Generate step, determined by a Configure Preset.
2.Build step, determined by a Build Preset.
3.Install step (optional).
Configure/Generate
Some CMake tools offer a separate Configure and Generate step. However, in winIDEA, they are combined into one action in the Configure button  .
.
Your project will also be automatically regenerated when:
•Presets are reloaded,
•The CMakePresets file is changed,
•The CMakeLists file is changed,
•Any .cmake file which is part of the project is changed, including the toolchain file,
•A different configure preset is selected.
Build
Click on the Build button  to start building your project.
You can also compile only the currently open source file, with Ctrl+F7. Note that this is only available when the Ninja generator is used.
Install
To enable the Install button  , an install rule must be defined in the CMake files.
Install rules provide various functions, including copying the build output of CMake targets to a different folder. This is necessary when your project contains multiple configure presets with different binary directories. In such cases, the path to the final output executables of your CMake targets will vary based on the binary directory of the currently selected configure preset. However, winIDEA expects Program and Symbol files to be located at a fixed path relative to the workspace folder.
Install rules offer a solution. You can define a rule which copies the output of your targets to a common directory, and set the winIDEA Program and Symbol files to point to the files in the common install destination directory.
Below is an example of an install rule defined in the root CMakeLists.txt:
install(TARGETS Blinky DESTINATION ${CMAKE_CURRENT_LIST_DIR}/out) |
The output executable of target “Blinky” will be copied to the folder “out”, which is located in the workspace folder.
|
This issue will also be encountered when using multi-configuration generators, such as Ninja Multi-Config. In that case, the generator configuration is set in your Build Preset, and the output of each configuration will be located in different directories. To address this, you can define an Install rule similar to the one described above. |
This process can be simplified with the Run install after build in Tools | Options | Environment | CMake, as it will automatically perform the Install step after a Build, provided an install rule is defined.
Conversion from winIDEA Build Manager
winIDEA provides a tool that can convert winIDEA Build Manager projects (XQRF format) into CMake projects, to access it select Tools | Convert to CMake. It will generate a CMake project using only the options defined in the first Build Manager target, and it will consist of only one CMake target. Please take into account that Build Manager targets and CMake targets are not an equivalent concept.
|
The converter may not support every combination of compilers, compiler options, and linkers. The resulting project may require manual configuration to build successfully. |

After a successful conversion, the current build manager will be changed to CMake and winIDEA will generate the CMake project. The workspace XQRF file and the winIDEA Build Manager settings will remain intact.
winIDEA SDK
To interact with and retrieve information from a CMake project, you should call CMake as a command directly and use the CMake File API.
Troubleshooting
Refer to Knowledge Base.