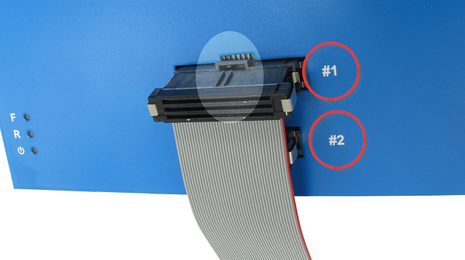
Two flat ribbon cables
If the Debug Adapter features two flat ribbon cables, it comes fixedly connected.
|
Connect the ribbon cable to the DTM #2 connector. |
The cable should be facing away from the BlueBox with the red (edge) wire on the side of the DTM #2 marking. Align the orientation key/notch of the cable connector with the notch on the BlueBox connector marked with #2. Press the cable connector carefully straight down until the latches lock.
|
Connect the ribbon cable to the DTM #1 connector. |
The cable should be facing away from the BlueBox with the red (edge) wire on the side of the DTM #1 marking. Align the orientation key/notch of the cable connector with the notch on the BlueBox connector marked with #1. Press the cable connector carefully straight down until the latches lock.
|
Connect the Debug Adapter to the Target. |
Refer to the chapter Debug Adapter and Target.
|
Disconnect. |
In order to disconnect the flat ribbon cables from the DTM #1 or #2 connector, squeeze the two metal latches on the cable connector from the side and pull the cable from the DTM #1 respectively #2 connector.


